A time-lapse is a creative film-making, and editing technique that manipulates the display of frames, i.e., frames get shot significantly slower as compared to their standard rate.
Recording a time-lapse is an effective way of explaining any creative process or activity in a short interval. Even multinational companies use this fantastic technique for different purposes. A prime example – according to FirstPost, Google Earth recently added a timelapse feature for imaging satellites.
When it comes to screen recording a time-lapse of a screen, numerous applications facilitate convenient recording and editing of time-lapses. A notable app that lets you record a screen timelapse is Hustl. In this article, we will look at how you can record a time-lapse video of your Mac screen using Hustl and how to configure the app for recording different types of timelapse videos.
Steps to Record a Screen Timelapse using Hustl:
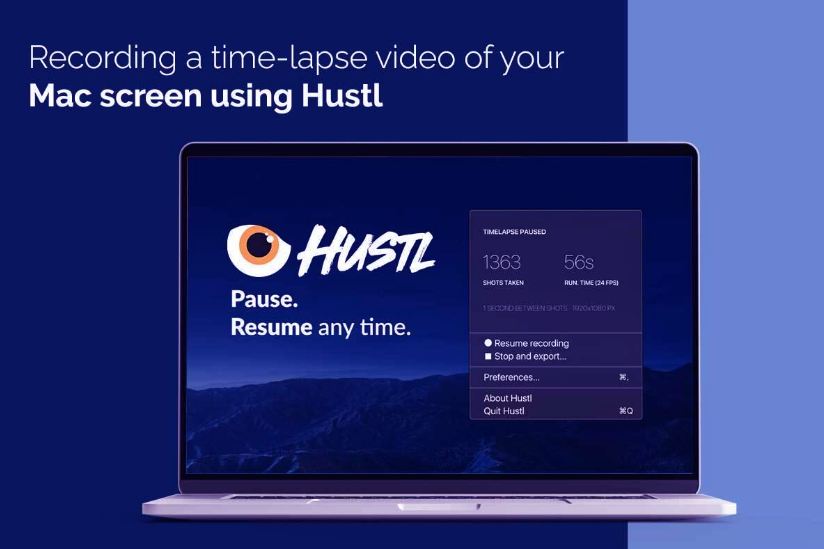
Hustl makes recording a time-lapse video of your Mac screen very quick and easy. The application has been designed and engineered to record time-lapses of the screen specifically, and therefore, creating appealing videos is one of the app’s core functionalities. You can use Hustl to showcase your artistic skills, create your workflow’s documentation, etc. The application allows you to select the specific application you wish to record, and thus, you can perform other tasks while the app records. You can also pause the app at any moment and get quick insights about your ongoing time-lapse recording. Whether adjusting the FPS count or selecting the export quality, the application lets you customize everything as per your requirements.
Here are the steps following which you can record an engaging timelapse of your Mac screen:
Step 1: Download and Install the Hustl application.
Step 2: Open the application and press the “Record” button.
Step 3: Once you have recorded the required part, click on the “stop” button.
Yes, these are all the steps you need to acquire a ready-to-share timelapse video of your Mac screen. Hustl stands out because it directly records an authentic timelapse video instead of recording a real-time video and then converting it into a timelapse by speeding it. The app makes creating a timelapse video of a Mac screen effortless and immensely convenient.
Configuring Hustl According To Your Recording Needs
Once you have installed Hustl, you need to configure your preferences to record different varieties of timelapse videos. Firstly, you would need to click on the app’s icon and choose the gear icon to open up a context menu. From there, click on “Preferences” and open the “registrations” tab. In this section, you will find a variety of settings. Let’s take a look at the settings to help you choose the right ones for yourself better:
Recording Settings
This section provides you with options to select the duration (in seconds) between multiple takes while recording a timelapse video of your screen. In simple words, it refers to the interval or gap between shots. These intervals are what will determine your final video’s speed. The application allows you to choose one from seven interval durations. Once you have selected your preferred interval, you will need to lock in the recording quality you want. There are two options – Normal and Maximum. Needless to say, selecting the later one will put more strain on your Mac as compared to the former one. Then comes selecting the crop area. It is recommended that you keep setting it to “Full Screen”. Opt for it if you wish to record all activities such as accessing menu options & time. If you wish to capture only a specific portion, you can choose to go for the cropped view option.
Export Settings
This section is about your timelapse video’s final output. You can choose from different frame rate settings while exporting your timelapse. Before you start recording, you can pre-set the FPS you wish to record the screen time-lapse at. Four “Frames per second” options are present here – 12, 24, 30, and 60. Furthermore, you can also choose your preferred resolution. From the drop-down menu, you can choose any resolution between 480p and 8k. You should keep in mind that the higher the resolution, the more strain your Mac’s CPU will face. Therefore, choose only the required options. As of now, you can only choose between these two universally-accepted video formats – MP4 & MOV. Once you have customized the settings based on your preferences, you can start recording.
One of the best aspects of using a custom-accelerated application like Hustl is that you do not waste too much time and energy performing needless actions. The app prevents you from following the orthodox way of recording the screen and converting it into a time-lapse. Thus, you skip a lot of unnecessary steps.